User Guide
Welcome to the official user guide for StudMap! If you are a teaching assistant (TA) for a computing module, and you’re swamped with the admin workload of managing your students, this application is just for you!

1. Overview
StudMap is a lightweight desktop application for managing your students and handling your TA responsibilities. With a suite of powerful features to search and organize your students as well as built-in attendance, participation and assignment tracking, StudMap can resolve all your TA woes and more!
Additionally, StudMap is optimized for use via a Command Line Interface (CLI): just type instructions to StudMap through a text box, and StudMap will do it for you — it’s like magic! Yet, it has all the benefits of a traditional application with a graphical interface: you can still see, at a glance, a neat overview of what you need to see. If you type fast, StudMap can get your student management tasks done faster than anything else.
This user guide aims to help you understand StudMap, so that you can make the best use of our features. You can read on to find out more about why StudMap is a good fit for you, or if you can’t wait to use this application, jump straight into the next section introducing our user guide.
1.1 Table of Contents
- 1. Overview
- 2. Why StudMap?
- 3. How to use this User Guide
- 3.1 User Guide Notation Overview
- 4. Quick Start
- 5. Features
- 6. Frequently Asked Questions
- 7. Command Summary
- 8. Glossary
2. Why StudMap?
Let’s face it — nobody loves keeping track of administrative details. It’s not the most interesting part of any job. If you are a TA for a computing module, you probably didn’t sign up out of your love for admin work. Sadly, administrative work is a necessary evil for TAs, so the best you can do is to make conquering it more efficient.
2.1 What do TAs do?
As a TA, you will find yourself juggling various tasks:
- Grading of assignments, and managing this grading process
- Tracking attendance of students for various classes
- Managing your students’ progress
Managing these may be initially easy, but they can quickly pile up and become more tedious if not handled properly, especially with the lack of tools available.
2.2 What tools do TAs currently use?
Spreadsheets
One of the tools you may commonly encounter is spreadsheets, such as Microsoft Excel or Google Sheets, often provided by the head teaching assistant. However, when using these tools, you may notice that there are a lot of redundant features which you don’t use, but clutter up your screen. Some features you actually want to use are instead hidden in the stash of icons and menus that you need to painstakingly sieve through.
That’s not even the worst part! The module you’re teaching might demand separate spreadsheets to keep track of different items such as assignments and attendance which can be a huge hassle. Indeed, during our research, this is a point brought up by multiple TAs.
Note-Taking Applications
After being annoyed by all the spreadsheets, some TAs fall back to personal note-taking applications, such as Apple Notes, Microsoft OneNote, or Notepad. If you use these, however, you realize that formatting is often difficult to do. Useful functionalities like sorting and filtering are also difficult to access, if not non-existent.
2.3 The Lament of TAs
After trying all of these tools, you may start wondering: why am I wasting time on admin work when it can be better spent doing more productive tasks for myself or my students? You’re tired, and you just want to catch up on your sleep schedule!
Be assured that you are not alone in this endeavor. According to an analysis done by University College London on the Teaching and Learning International Survey, a significant portion of teachers consider too much admin work as a source of their workload stress, which can in turn affect their mental well-being. You wouldn’t want this to happen to you!
2.4 Our Solution
StudMap is our solution for you. It is a lightweight desktop app that addresses your needs as a TA. With a set of essential yet easy-to-use features, we aim to fill the void between spreadsheets and traditional note-taking apps, to provide you with the necessary tool to perform record keeping effectively. This user guide is a reference for you, so that you know how to make the most out of StudMap.
3. How to use this User Guide
Thank you for choosing StudMap! This user guide will help you navigate our beloved software.
- You can head off to Section 4: Quick Start for a quick tutorial.
- If you’re already using StudMap, check out Section 5: Features to get in-depth information
about each command you can give StudMap.
- For advanced users, check out Section 7: Command Summary for an easy all-in-one record for all
the commands.
- If you see any unfamiliar terms, check out the Section 8: Glossary for more information.
- If you still have any other questions regarding StudMap and its usage, check
out Section 6: FAQ for answers to some frequently asked questions.
3.1 User Guide Notation Overview
Throughout the guide, various types of notation are used to convey important information about its usage.
Here are some of the symbols and syntax to look out for:
| Symbol / Syntax | Meaning |
|---|---|
| Information about commands or formats that you should be aware of | |
| Warning of potential user scenarios you might face that can lead to errors | |
| Tips that can help you save time using StudMap | |
code |
Indicates commands or parameters that can be inputted into StudMap |
4. Quick Start
If you’re new to StudMap, this is the tutorial for you! Here are the steps for you to get started:
4.1 Installation
-
Ensure you have Java 11 or above installed in your computer. See here for more detailed installation instructions for Java.
-
Download the latest
studmap.jarhere. -
Create a folder where you want to use StudMap, and copy
studmap.jarinto it. This will be the home folder for StudMap. -
Double-click on
studmap.jarto start the app. In a few seconds, you should see a new window detailed in the next section.
4.2 Understanding the User Interface
When you first load StudMap, you will likely be greeted with a display similar to the one below, containing some sample data. Don’t be overwhelmed! While there may be many fields and objects to take in at first, let’s go through the User Interface and explore each element one by one.

Take note of the three main elements of the interface:
| Element | Purpose |
|---|---|
| Command Box | This is where you give instructions to StudMap, telling StudMap what you want to do. These instructions are called Commands. |
| Reply Box | This is where StudMap replies with any useful feedback, for example after running a command. |
| Student List | This is where StudMap displays the list of students, with information about each student organized into individual student cards. |
Student Cards
As a student management tool, the core of StudMap is naturally your students. StudMap can store information about your student, such as personal particulars or module-related progress, and represents it in a single rectangular panel called a student card.
The left half of each student card contains the student’s particulars. Let’s zoom in and find out more:
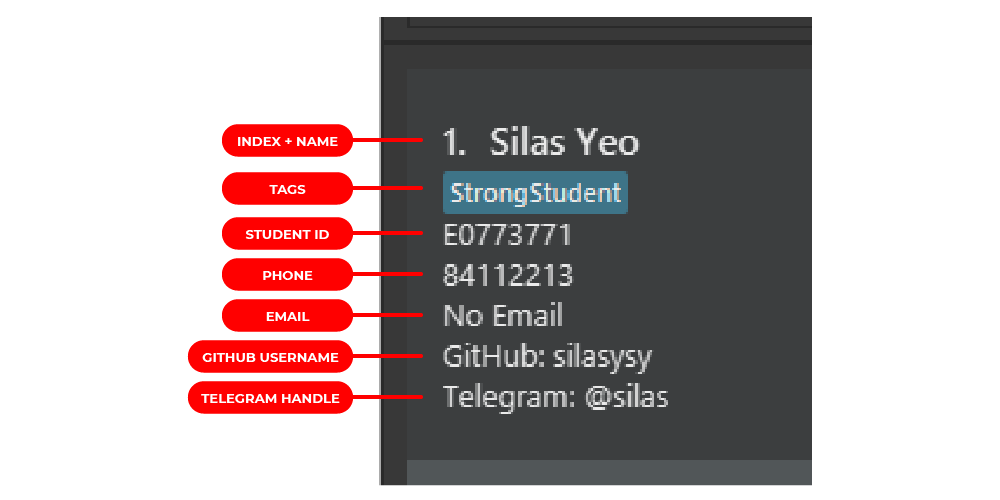
| Element | Purpose |
|---|---|
| Index | Order of the student in the list. Used to indicate which student card you want to target with a command. |
| Student Name | Name of your student. Is Compulsory! |
| Tag | Tag appended to your student, providing additional information about him or her. |
| Student ID | Student ID of your student, usually beginning with E. Is Compulsory! |
| Phone Number | Phone number of your student, if available. |
| Email address of your student, if available. | |
| GitHub Username | GitHub username of your student, if available. |
| Telegram Handle | Telegram handle of your student, if available. |
The right half of each student card contains module information related to your TA responsibilities:
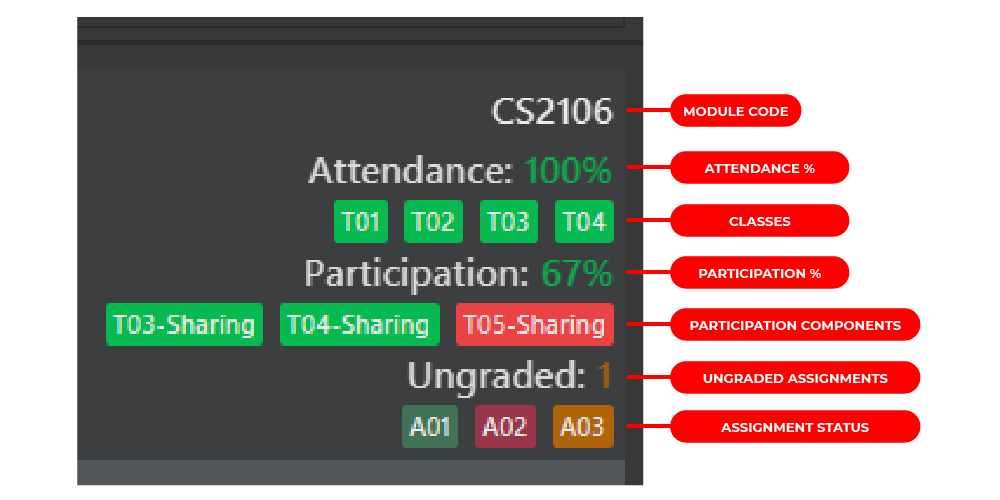
| Element | Purpose |
|---|---|
| Module | Module you are teaching your student. Is Compulsory! |
| Attendance Percentage | Percentage of classes that your student has been marked present. |
| Classes | Detailed record of classes for your student. Each box represents one class:
|
| Participation Percentage | Percentage of participation components that your student has qualified for. |
| Participation Components | Detailed record of participation for your student. Each box represents one component:
|
| Ungraded Assignments | Number of ungraded assignments (assignments marked as received) that you yet to have graded. |
| Assignment Status | Detailed record of assignments for your student. Each box represents one assignment:
Note: There are 3 assignment statuses: Graded for assignments finished grading (represented by green), Received for assignments your students have submitted and require marking (represented by red), and New for new assignments your students have not yet submitted (represented by yellow) |
![]() Note 1: Each student is uniquely identified by their name, student ID and module combined.
This means that two students with the same name and module are considered distinct if they have different student IDs.
Note 1: Each student is uniquely identified by their name, student ID and module combined.
This means that two students with the same name and module are considered distinct if they have different student IDs.
![]() Note 2: Each student in StudMap can only be attached to one module. If you are tutoring a student
for more than one module, you will have to create separate entries for that student, each with a different module. This ensures
that data from one module (e.g. Attendance for CS2103T) will not be mixed with that from another module (e.g. Attendance for CS2040).
Note 2: Each student in StudMap can only be attached to one module. If you are tutoring a student
for more than one module, you will have to create separate entries for that student, each with a different module. This ensures
that data from one module (e.g. Attendance for CS2103T) will not be mixed with that from another module (e.g. Attendance for CS2040).
4.3 Understanding Commands
Now that you understand the User Interface of StudMap, what can you do to interact with it?
StudMap is designed around the use of a Command Line Interface (CLI). This means that accessing or modifying data on
StudMap has to be done by typing instructions, or commands, that StudMap can understand and execute.
Command Word
The format of any command is standard. The command is first identified by its command word, which usually describes its main functionality. Examples of some useful commands are:
-
list, which lists the entire student list on StudMap
-
sort, which sorts the student list in a certain order
-
grade, which adds information about an assignment you have graded for a student
Parameters
Sometimes, you may need to include extra details about your instruction to perform a certain task (e.g. what way do you
want to sort the list?). You can do this by adding parameters, or extra options, behind the command word to specify
further instructions
Here’s an example of how parameters can be used:
- You wish to change the name of the second student to “Salad”.
- You can type the
editcommand word, which will indicate to StudMap you want to edit a student
- You can then provide two parameters:
2, which is the index of the student to be edited, andn/Salad, which is the name you want
- The final command will look like this:
edit 2 n/Salad!
![]() Tip: Confused about which commands use what parameters? Do not fret! Keying in the command word into the command box
and pressing enter will give you all the information about the command: what it does, what parameters it takes and so on!
Tip: Confused about which commands use what parameters? Do not fret! Keying in the command word into the command box
and pressing enter will give you all the information about the command: what it does, what parameters it takes and so on!
To learn more about parameters, do check out the section on information about parameters!
Example Commands
With the power of commands, you can now truly wield StudMap to organize your students and accomplish your TA responsibilities. Commands will allow you to add new students to the list, append assignments to be graded or attendances that have been marked, and so much more!
Let’s try out some commands! Type or copy a command into the Command Box and press Enter to execute it.
-
list- This updates the Student List with all the students you have.
- This updates the Student List with all the students you have.
-
add n/John Doe m/CS2103T id/E1234567- This adds a student named John Doe with student ID
E1234567into StudMap, who is taking the moduleCS2103T. This is one of the ways you can add a new student into StudMap.
- This adds a student named John Doe with student ID
-
mark 1 present c/Tut5- This marks the 1st student currently shown in the Student List as present for the class “Tut5”.
- This marks the 1st student currently shown in the Student List as present for the class “Tut5”.
-
delete 3- This deletes the 3rd student currently shown in the Student List.
- This deletes the 3rd student currently shown in the Student List.
-
clear- This deletes all the students, so you can start with a clean slate!
- This deletes all the students, so you can start with a clean slate!
This is just a short preview of the features that StudMap has to offer. The Features section will guide you through all available commands in greater detail!
4.4 Migrating to StudMap
You may be concerned: you’re probably already using some spreadsheet of sorts for keeping track of student data – and you certainly don’t want to transfer all this data manually to StudMap! We’ve got you covered.
Download this Student Information Template. If you want a sample of how to use it, check out this Example Template, or check out Import Command for more details.
That’s all for the tutorial! Check out the Features section for more detailed information about each command. We hope you enjoy using StudMap!
5. Features
5.1 Introduction
Welcome to the Features section of StudMap. We have three categories of
features:
Read on to learn in detail about the plethora of features that StudMap has in store for you! Worried about the learning curve? StudMap is designed to be extremely intuitive, with in-built help messages guiding you every step of the way!
Follow the guide below, and you would be on track to mastering all the necessary commands in no time.
5.2 Information about Parameters
Before we start looking at each feature in detail, let’s take note of some conventions that we will use in this guide. This will help you understand the guide better!
![]() Understanding the command format:
Understanding the command format:
-
Words in
UPPER_CASEare the parameters to be supplied by the user.
e.g. inadd n/NAME,NAMEis a parameter which can be used asadd n/John Doe. -
Items in square brackets are optional.
e.g.n/NAME [t/TAG]can be used asn/John Doe t/friendor asn/John Doe. -
Items with
… after them can be used multiple times including zero times.
e.g.[t/TAG]…can be used ast/friend,t/friend t/familyetc. -
Parameters can be in any order.
e.g. if the command specifiesn/NAME p/PHONE,p/PHONE n/NAMEis also acceptable. -
If a parameter is expected only once in the command, but you specified it multiple times, only the last occurrence of the parameter will be taken.
e.g. if you specifyp/12341234 p/56785678, onlyp/56785678will be taken. -
Extra parameters for commands that do not take in parameters (such as
help,list,exitandclear) will be ignored.
e.g. if the command specifieshelp 123, it will be interpreted ashelp.
Throughout this section, you will see numerous parameters being used by different commands. Here is a consolidated summary of the parameters and any remarks (e.g. constraints) that might be of relevance. Don’t worry if this seems overwhelming! You do not need to memorise these parameters, as they will be explained throughout the guide whenever they are used in the command!
| Parameter | Remarks |
|---|---|
| INDEX | Number used to specify the student you wish to target. Can be replaced with ALL to target all students in displayed list |
| KEYWORD | Used in filter
|
| ORDER | Used in sort, can take two values: asc or dsc |
| STATUS | Used to represent status of assignments (new/received/marked), attendance (present/absent) and participation (yes/no) |
| a/ASSIGNMENT | Assignment to be recorded for your student. Constraint: Must consist of alphanumerics, spaces, dashes and underscores only |
| a/ATTRIBUTE | Attribute to be used for sorting
|
| c/CLASS | Class to be recorded for your student Constraint: Must consist of alphanumerics, spaces, dashes and underscores only |
| e/EMAIL | Email for your student. Constraint: Must be of the format local-part@domain |
| g/GITNAME | GitHub Username for your student |
| h/TELEHANDLE | Telegram Handle for your student. Constraint: Must have @ before the handle e.g. @handle |
| id/ID | Student ID for your student |
| m/MODULE |
Module for your student. Constraint: Must follow NUS Module naming convention: letters, then 4 digits, and finally an optional letter suffix (i.e. CS2103T) |
| n/NAME | Name for your student |
| p/COMPONENT |
Participation Component to be recorded for your student. Constraint: Must consist of alphanumerics, spaces, dashes and underscores only |
| p/PHONE | Phone number for your student. Constraint: Must consist of only numbers, and an optional + at the beginning. Must have at least 3 digits |
| t/TAG |
Tag for your student Constraint: Must be only alphanumeric |
![]() Here are some explanations about the format constraints for certain parameters that you may
find too restrictive.
Here are some explanations about the format constraints for certain parameters that you may
find too restrictive.
-
PHONE: StudMap currently only allows you to record one phone number for each student, as supporting multiple numbers (i.e. Home number) for your student is considered Out of Scope.
-
MODULE: StudMap is designed as a tool for NUS TAs, and thus StudMap currently only supports the code format for NUS modules. Future plans for StudMap include expanding this format to more universities.
5.3 Student List Management
- 5.3.1 Adding a student:
add - 5.3.2 Deleting a student:
delete - 5.3.3 Clearing all entries:
clear - 5.3.4 Importing students from CSV file:
import - 5.3.5 Listing all students:
list - 5.3.6 Locating students by name:
find - 5.3.7 Sorting the students:
sort - 5.3.8 Filtering the students:
filter
5.3.1 Adding a student: add
Function: Adds a student to StudMap.
New student attending your class? Add them into StudMap to start managing their records! This is one of the ways you can
add a student into StudMap.
Format: add n/NAME m/MODULE id/ID [p/PHONE] [e/EMAIL] [g/GITNAME] [h/TELEHANDLE] [t/TAG]…
Examples:
-
add n/John Doe m/CS2103T id/E1234567adds student namedJohn DoetakingCS2103Twith student idE1234567.
-
add n/Betsy Crowe t/PotentialTA e/betsycrowe@example.com id/E3141592 m/CS2101 p/1234567adds student namedBetsy CrowetakingCS2101with student idE3141592, emailbetsycrowe@example.com, phone number1234567and tagged asPotentialTA.
-
add n/Silos Yao t/StrongStudent g/silosyao id/E1234567 m/MA5203adds student namedSilos YaotakingMA5203with student idE1234567and tagged asStrongStudent.
See Also:
import
5.3.2 Deleting a student: delete
Function: Deletes the specified student from the StudMap.
Did your student withdraw from the module midway through the semester? You can remove them from so that your StudMap
remains clutter-free!
Format: delete INDEX/ALL
-
INDEX: You can specify the index of the student you want to delete. The index refers to the index number shown in the displayed student list. The index must be a positive integer 1, 2, 3, …
-
ALL: You can delete all the students currently displayed.
Examples:
-
listfollowed bydelete 2deletes the 2nd student in the StudMap.
-
find Betsyfollowed bydelete 1deletes the 1st student in the results of thefindcommand.
See Also:
clear
5.3.3 Clearing all entries: clear
Function: Clears all entries from the StudMap.
Need to start afresh? Delete all the entries from StudMap with this command.
Format: clear
See Also:
delete
5.3.4 Importing students from CSV file: import
Function: Imports student data from a CSV (Comma-separated Values) file stored on your computer.
Just starting out with StudMap? Simply copy and paste in the necessary details into a template, and StudMap will handle
the rest — it’s like magic. For your convenience, you can find the import template
here.
Format: import
- Importing student data will add students to the existing student list, and will not clear any existing students
- Running the command will open a file browser for you to select the CSV file to import
- The CSV format accepted by StudMap is strict! Please use the template provided.
Example Use Case: Importing a fresh batch of students as a new StudMap user
- Remove the default list of students by typing
clear
- Modify the import template using the CSV editor of your choice (e.g. Excel, Notepad)
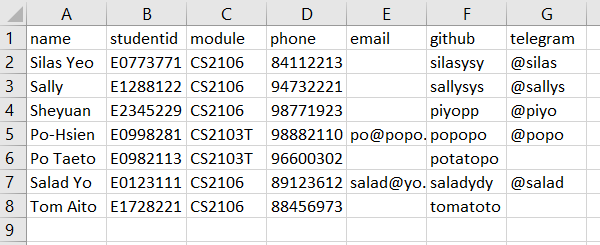
Example of a properly edited import template which you can download here: example csv
- Type the
importcommand and select the CSV file you have modified
- If done correctly, StudMap will create the new students using the data from the CSV file uploaded
See Also:
add
5.3.5 Listing all students: list
Function: Shows a list of all students in the StudMap.
Want to take a look at all your students? This is the command you’re looking for.
Format: list
5.3.6 Locating students by name: find
Function: Finds students whose names contain any of the given keywords.
If you’re searching for a student by name, this is a fast shortcut for you. If you’re looking for more specific
filtering, such as by their module, see filter.
Format: find KEYWORD [MORE_KEYWORDS]
- The search is case-insensitive. e.g.
hanswill matchHans
- The order of the keywords does not matter. e.g.
Hans Bowill matchBo Hans
- Only the name is searched.
- Only full words will be matched e.g.
Hanwill not matchHans.
- Students with name matching at least one keyword will be returned (i.e.
ORsearch). e.g.Hans Bowill returnHans Gruber,Bo Yang.
Examples:
-
find tomreturnsTom Aito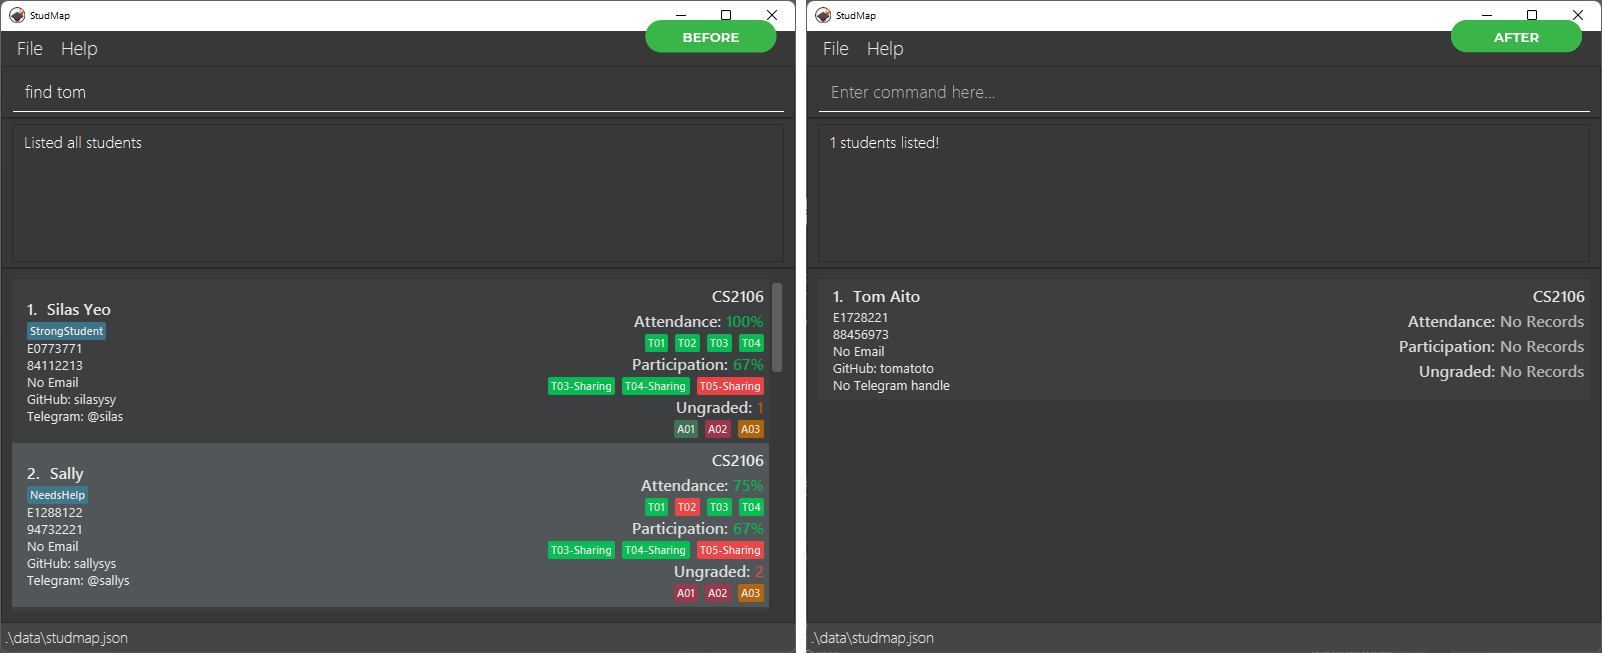
-
find JohnreturnsjohnandJohn Doe
-
find alex davidreturnsAlex YeohandDavid Li
See Also:
filter
5.3.7 Sorting the students: sort
Function: Sorts the list by the specified attribute in the specified order.
When managing your students, you might want to focus on a certain aspect of the module to track. For instance, you may
wish to clamp down on absenteeism and identify students who are constantly missing from class. To achieve this, you can
sort the StudMap by ATTENDANCE.
Format: sort ORDER a/ATTRIBUTE
-
ORDER: You can specify the order you wish to sort your StudMap.-
asc: Sort in ascending order. -
dsc: Sort in descending order.
-
-
ATTRIBUTE: You can specify the attribute which you want to sort the StudMap by. Currently, the following attributes are supported:NAMEMODULEPHONEIDGITHANDLEEMAILATTENDANCEASSIGNMENTPARTICIPATION
![]() Note 1: If student has no records for the specified sorting attribute, they will be sorted to
the end of the StudMap.
Note 1: If student has no records for the specified sorting attribute, they will be sorted to
the end of the StudMap.
![]() Note 2: When sorting by
Note 2: When sorting by ASSIGNMENT, we are actually sorting by number of marked assignments.
![]() Note 3: When sorting by
Note 3: When sorting by ATTENDANCE and PARTICIPATION, we are sorting
by % of classes attended and % of components participated correspondingly.
Examples:
-
sort asc a/attendancesorts list byATTENDANCEin ascending order
-
sort asc a/namesorts list byNAMEin ascending order
-
sort dsc a/phonesorts list byPHONEin descending order
5.3.8 Filtering the students: filter
Function: Filters students from the StudMap based on different categories.
If you want to check on the progress of weaker students you tagged as NeedsMoreHelp, for example, you can filter by
tag to focus on them. If you’re teaching multiple modules at once, you can filter by module to focus on the module
you’re currently interested in. If you want to find those assignment submissions you have yet to grade, you can filter
by assignment.
Formats:
-
filter t/Keyword [MORE_KEYWORDS]- Filters students specific to the category “tag” represented with the prefix
t/
- Filters students specific to the category “tag” represented with the prefix
-
filter m/Keyword [MORE_KEYWORDS]- Filters students specific to the category “module” represented with the prefix
m/
- Filters students specific to the category “module” represented with the prefix
-
filter a/Keyword [MORE_KEYWORDS]- Filters students specific to the category “assignment” represented with the prefix
a/
- Filters students specific to the category “assignment” represented with the prefix
![]() Note: The filter command only successfully filters if there is an exact match between the category and
the keyword provided.
Note: The filter command only successfully filters if there is an exact match between the category and
the keyword provided.
Example: filter t/friends will filter students who have the tag friends, but filter t/fri will not.
Example:
-
filter t/ friendswill return a filtered list of students that are tagged as friends
-
filter m/ cs2103twill return a filtered list of students that are enrolled in the moduleCS2103T.
-
filter a/ a01will return a filtered list of students that are working on assignmentA01.
-
filter t/PotentialTA StrongStudentwill return a filtered list of students that are tagged as potential teaching assistants, strong students, or both.
See Also:
find
5.4 Student Updating
- 5.4.1 Editing a student:
edit - 5.4.2 Marking attendance of student:
mark - 5.4.3 Unmarking attendance of student:
unmark - 5.4.4 Grading assignment for student:
grade - 5.4.5 Removing assignment from student:
ungrade - 5.4.6 Recording participation of student:
participate - 5.4.7 Removing participation of student:
unparticipate - 5.4.8 Adding tag to student:
tag - 5.4.9 Removing tag from student:
untag
5.4.1 Editing a student: edit
Function: Edits an existing student in the StudMap.
Need to update outdated student details? You can easily edit that field without deleting and re-adding the student.
Format: edit INDEX/ALL [n/NAME] [p/PHONE] [e/EMAIL] [m/MODULE] [id/ID] [g/GITNAME] [h/TELEHANDLE] [t/TAG]…
-
INDEX: You can specify the index of the student you want to edit. The index refers to the index number shown in the displayed student list. The index must be a positive integer 1, 2, 3, …
-
ALL: You can edit all students currently displayed.
-
At least one of the optional fields must be provided.
- Existing values will be updated to the input values.
- When editing tags, the existing tags of the student will be removed i.e. adding of tags is not cumulative.
- You can remove all the student’s tags by typing
t/without specifying any tags after it.
- You can remove the student’s phone, email, GitName, TeleHandle by typing
p/,e/,g/,h/respectively.
Examples:
-
edit 1 p/91234567 e/johndoe@example.comEdits the phone number and email address of the 1st student to be91234567andjohndoe@example.comrespectively.
-
edit 2 n/Betsy Crower t/Edits the name of the 2nd student to beBetsy Crowerand clears all existing tags.
5.4.2 Marking attendance of student: mark
Function: Marks students as present or absent for a specified class.
Need to record attendance for a class of students you just taught? Mark will help you keep track of who was present or
absent for that particular class.
Format: mark INDEX/ALL STATUS c/CLASS
-
INDEX: You can specify the index of the student you want to mark attendance for. The index refers to the index number shown in the displayed student list. The index must be a positive integer 1, 2, 3, …
-
ALL: You can mark attendance for all students currently displayed.
- Status accepts two values only:
presentandabsent
- Marking an existing class as either
presentorabsentwill overwrite the existing record
![]() Caution: Class names should only consist of alphanumerics, spaces, dashes and underscores! Using any other
character will lead to your class name being rejected
Caution: Class names should only consist of alphanumerics, spaces, dashes and underscores! Using any other
character will lead to your class name being rejected
Examples:
-
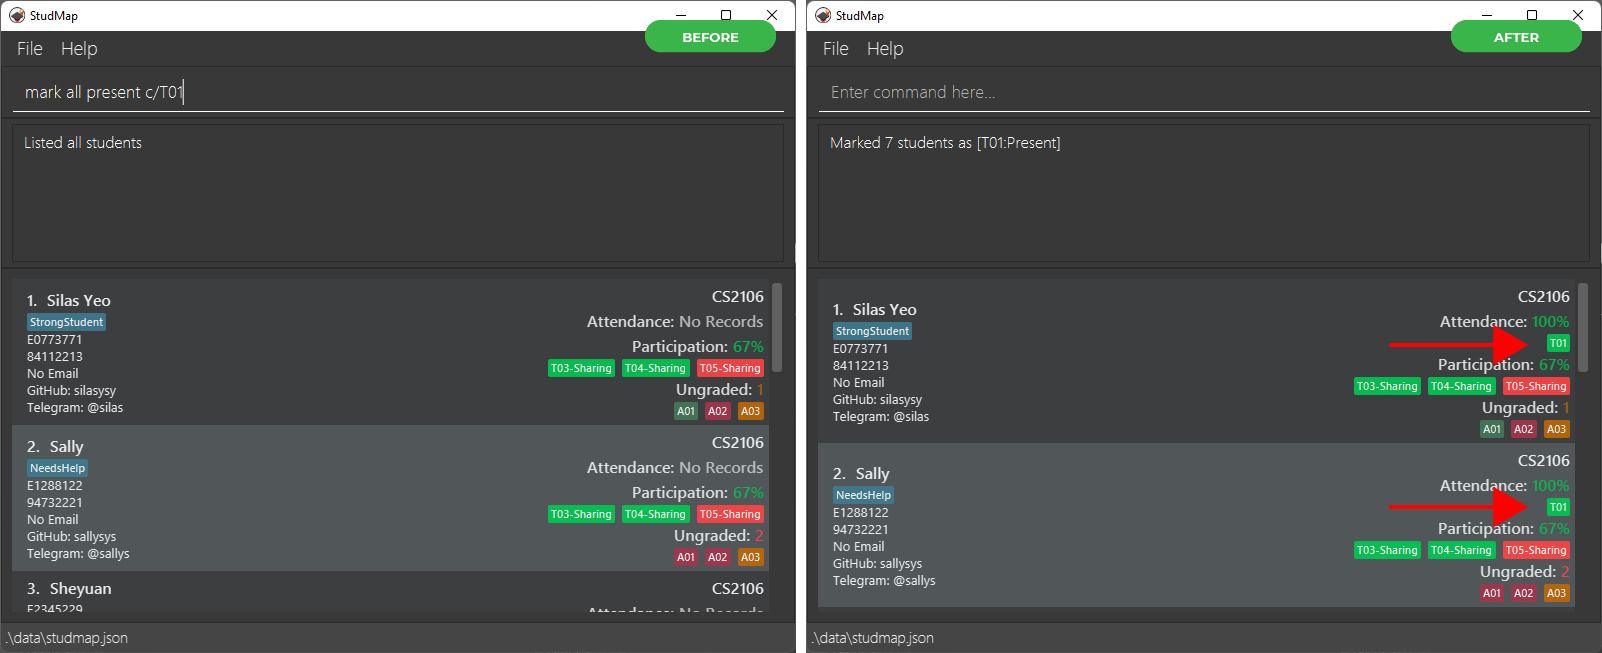
mark all present c/T01marks all students in the list as present for classT01.
-
mark 1 present c/T03marks the first student as present for classT03.
-
mark all absent c/T04marks all students in the list as absent for classT04.
See Also:
unmark
5.4.3 Unmarking attendance of student: unmark
Function: Removes the attendance record of a specific class from students.
Made a mistake with attendance tracking for a particular class? Unmark will remove any attendance records you want.
Format: unmark INDEX/ALL c/CLASS
-
INDEX: You can specify the index of the student you want to remove attendance record for. The index refers to the index number shown in the displayed student list. The index must be a positive integer 1, 2, 3, …
-
ALL: You can remove attendance record for all students currently displayed.
- StudMap allows for attendances to be removed even if the student never had any record for that class
(i.e. StudMap will inform you that the student has not been modified)
Examples:
-
unmark all c/wrongclassremoves the attendance record for classwrongclassfrom all students in the list who have such a record. In this case, all 7 students have the record.
-
unmark 1 c/T01removes the attendance record for classT01from the first student.
See Also:
mark
5.4.4 Grading assignment for student: grade
Function: Changes the grading status for a specific assignment for students.
You can change the grading status for the assignments using this command. If the record of the assignment does not yet exist for the specified student, a new entry for the assignment will be automatically created for the student. This can help you to better keep track of assignments that you have graded or received.
![]() Note: The name of assignments should contain only numbers and letters (all upper case). If
you include any lower case in the assignment name, it will be automatically converted to upper case.
Note: The name of assignments should contain only numbers and letters (all upper case). If
you include any lower case in the assignment name, it will be automatically converted to upper case.
Format: grade INDEX/ALL STATUS a/ASSIGNMENT
-
INDEX: You can specify the index of the student you want to change the assignment grading status for. The index must be a positive integer 1, 2, 3, …
-
ALL: You can modify the assignment grading status for every student in the currently displayed list.
-
STATUS: You can specify the grading status for the assignment. Currently, following three statuses are supported:-
new: The assignment has just been assigned to the student and hence it has not been submitted nor marked yet. -
received: You have received the assignment submission from the student, but you have not graded it yet. -
marked: You have received and graded the assignment.
-
-
ASSIGNMENT: You can specify the assignment which you want to change the grading status for.
Examples:
-
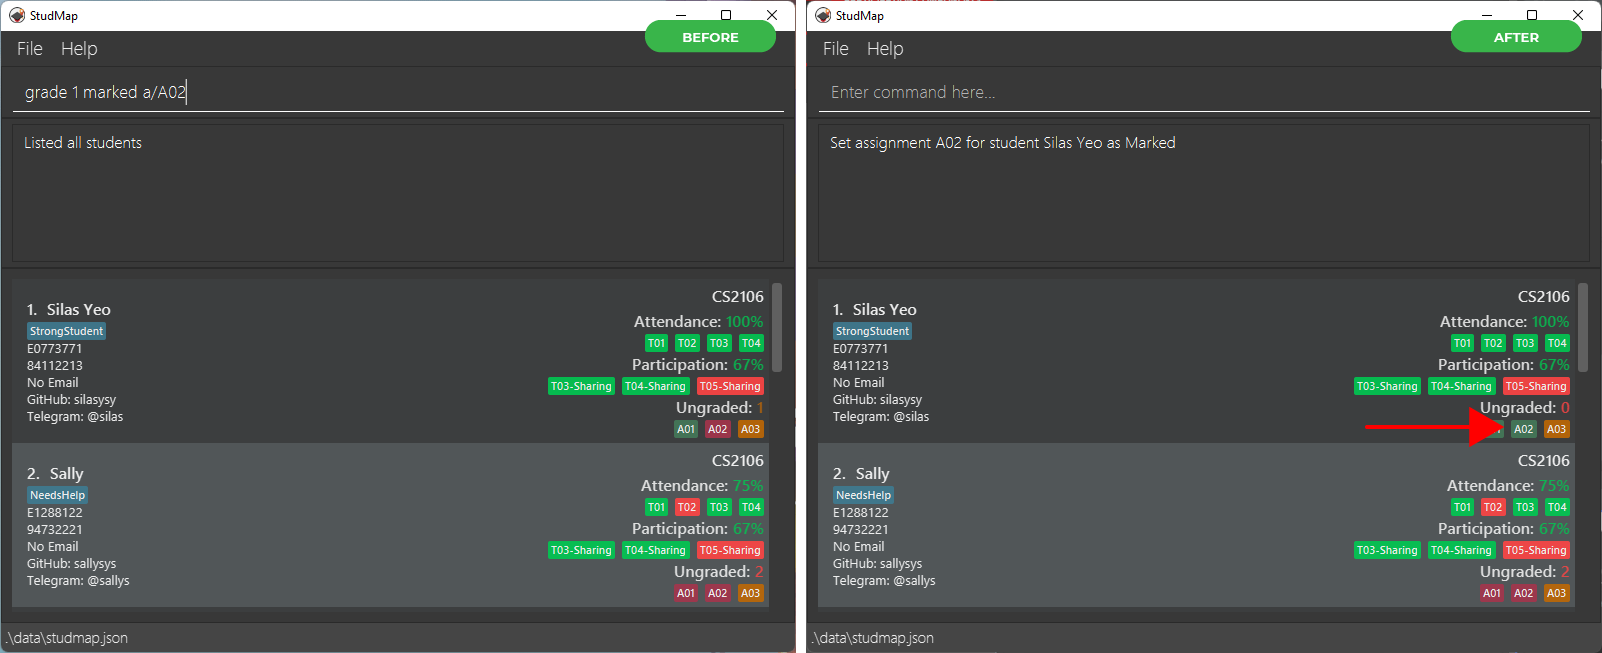
grade 1 marked a/A02changes the assignment grading status for assignmentA02of the first student in the list tomarked. Add an entry ofA02into the first student’s record if it does not exist yet. In this case, it already exists.
-
grade all marked a/A02changes the assignment grading status for assignmentA02of every student in the list tomarked.
See Also:
ungrade
5.4.5 Removing assignment from student: ungrade
Function: Removes the specified assignment from the student’s record.
Made a mistake with the name of an assignment, or need to remove certain assigment records? Ungrade will remove
any assignment records you want.
Format: ungrade INDEX/ALL a/ASSIGNMENT
-
INDEX: You can specify index of the student remove the assignment from. The index must be a positive integer 1, 2, 3, …
-
ALL: You can remove the assignment for all students in the currently displayed list.
-
ASSIGNMENT: You can specify the record of the assignment to be removed.
Examples:
-
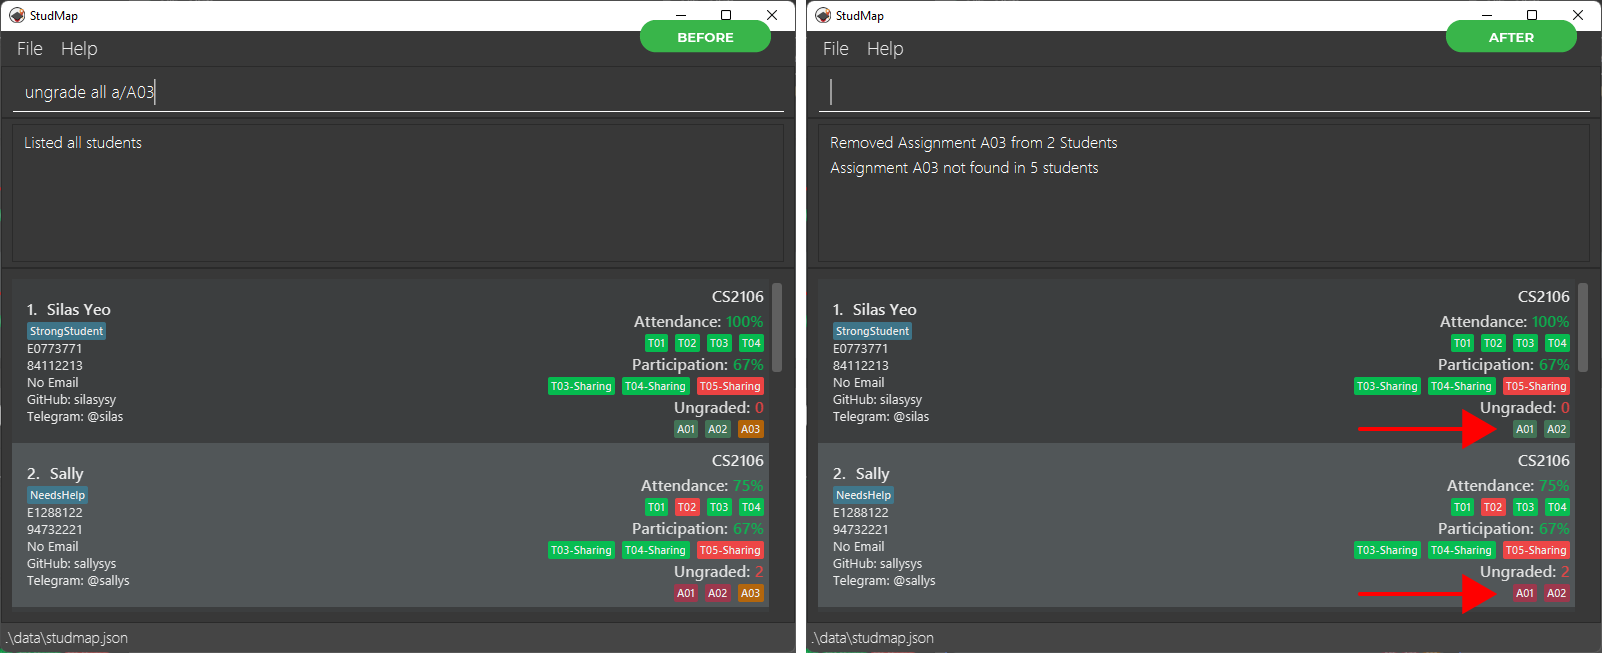
ungrade all a/A03removes assignmentA03from all students in the currently displayed list, if they have it. In this case, only 2 students have such a record.

-
ungrade 1 a/A01removes assignmentA01from the first student.
See Also:
grade
5.4.6 Recording participation of student: participate
Function: Records the participation of students in a given participation component.
Need to record who actively volunteered to share their answers in class for participation? Participate will help you
keep track of who participated for a particular component in your lesson.
Format: participate INDEX/ALL STATUS p/COMPONENT
-
INDEXcould be specified or useALLto record the participation component for all students in the list. The index must be a positive integer 1, 2, 3, …
-
ALL: You can record the participation component for all students in the currently displayed list.
-
STATUSis eitheryesfor participated ornofor not participated
-
COMPONENTis the participation component
Examples:
-
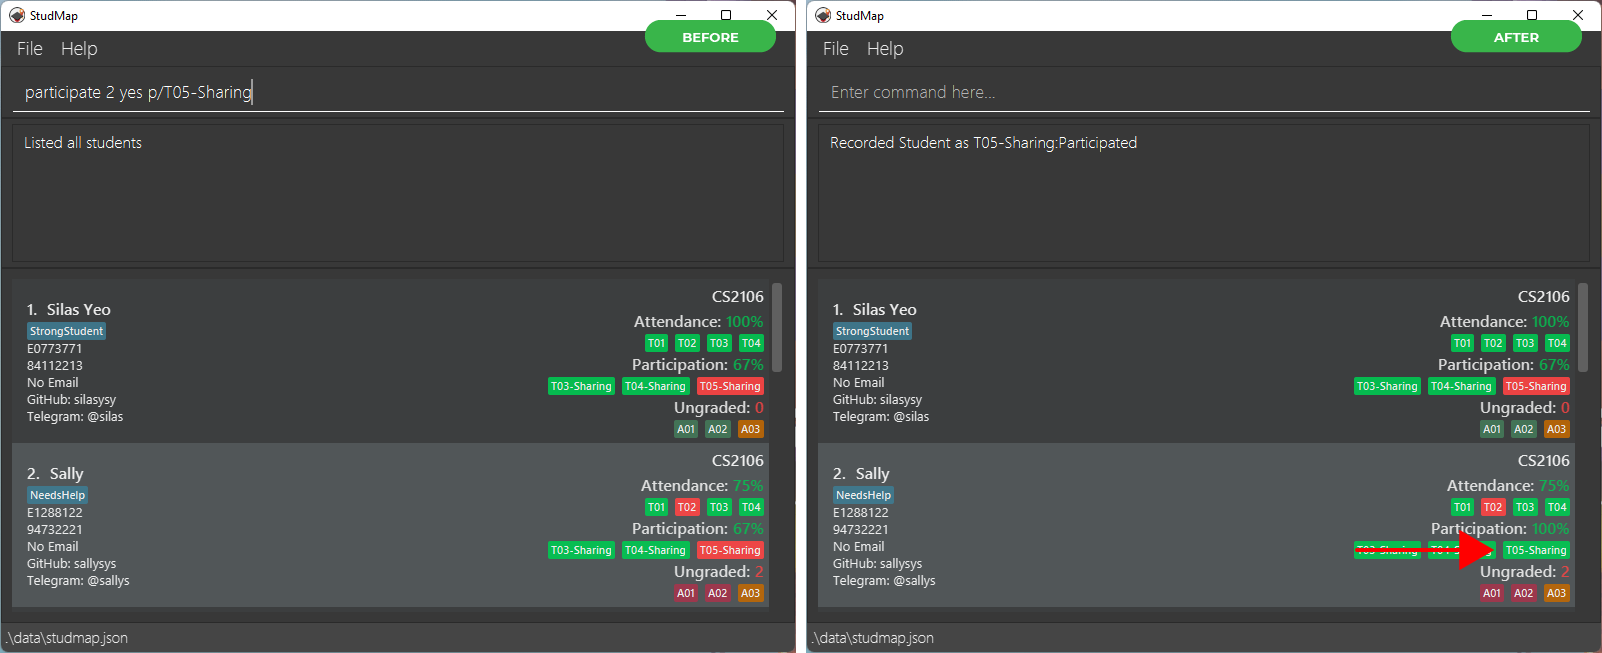
participate 2 yes p/T05-Sharingrecords the second student in the list as having participated for participation componentT05-Sharing. If the student does not have a record for the component yet, it is added. In this case, it already exists.
-
participate 1 yes p/P01records the first student in the list as having participated for participation componentP01.
-
participate 1 no p/P02records the second student in the list as having not participated for participation componentP01.
-
participate all yes p/P03records all students in the list as having participated for participation componentP03.
See Also:
unparticipate
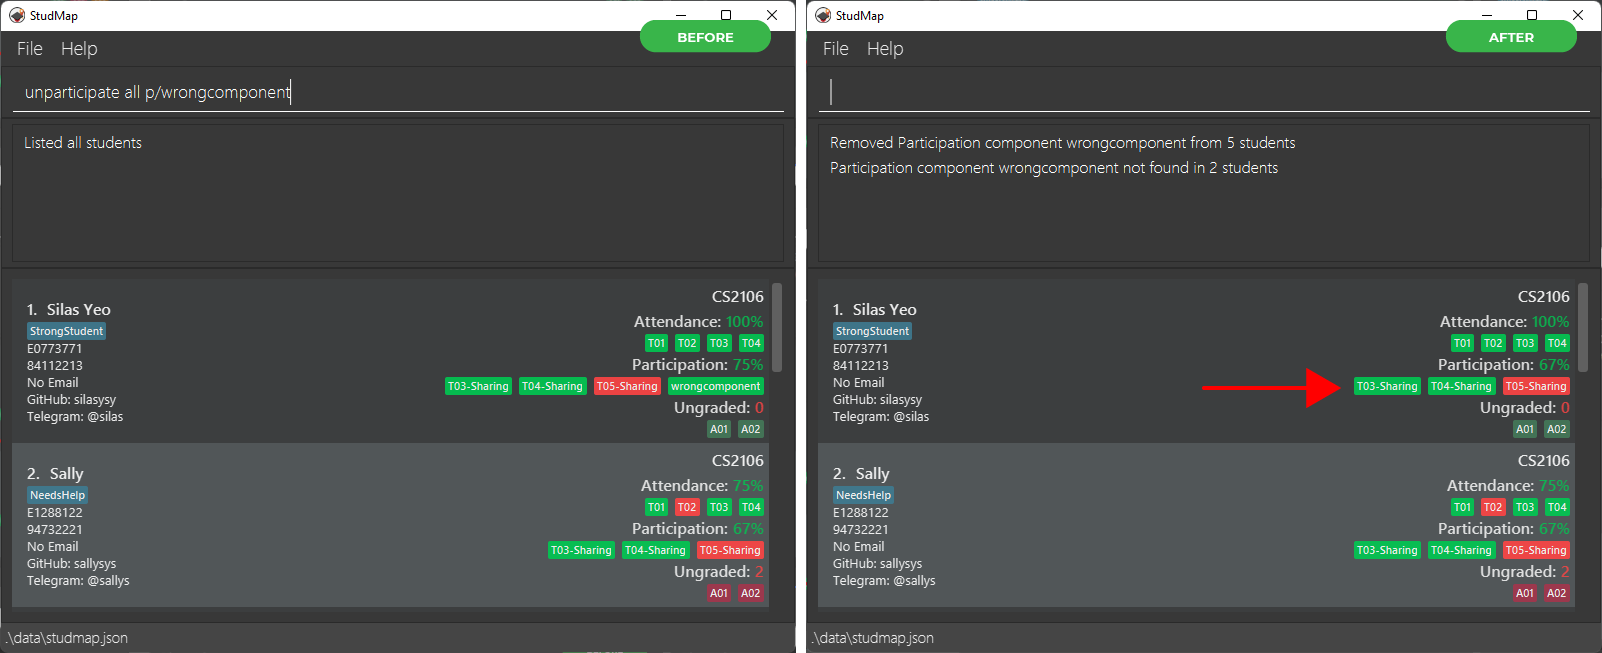
5.4.7 Removing participation of student: unparticipate
Function: Removes the record of participation for students in the given participation component.
Made a mistake with the name of a participation component, or need to remove certain participation records?
Unparticipate will remove any participation records you want.
Format: unparticipate INDEX/ALL p/COMPONENT
-
INDEXcould be specified or useALLto remove specified participation component for all students in the list. The index must be a positive integer 1, 2, 3, …
-
ALL: You can remove the participation component for all students in the currently displayed list.
-
COMPONENTis the participation component
Examples:
-
unparticipate all p/wrongcomponentremoves participation componentwrongcomponentfrom all students in the currently displayed list. In this case, 5 students have such a record.
-
unparticipate 1 p/P01removes participation componentP01from the first student in the currently displayed list.
-
unparticipate all p/P03removes participation componentP03from all students in the currently displayed list.
See Also:
participate
5.4.8 Adding tag to student: tag
Function: Adds one or more tags, or text labels, to students.
With this feature, you can keep small tidbits about your students on their entry. This can help you better identify and keep track of them.
![]() Note 1: The tag should be short and limited to only letters and/or numbers (i.e. no spaces)
.
Note 1: The tag should be short and limited to only letters and/or numbers (i.e. no spaces)
.
![]() Note 2: The tags are case-sensitive. For example,
Note 2: The tags are case-sensitive. For example, goodStudent and goodstudent will
be recognised as different labels.
![]() Note 3: The tagging command is cumulative, that is, new tags are simply added to the student(s)
and do not replace their previous tags. To remove tags from the student(s), see untag
below.
Note 3: The tagging command is cumulative, that is, new tags are simply added to the student(s)
and do not replace their previous tags. To remove tags from the student(s), see untag
below.
Format: tag INDEX/ALL t/TAG [t/OTHER]
-
INDEX: You can specify the index of the student you want to add the tag to. The index refers to the index number shown in the displayed student list. The index must be a positive integer 1, 2, 3, …
-
ALL: You can add tag(s) to all students currently displayed.
-
TAG: You can specify the label to be added to the student. At least one label should be specified when you use this command
-
OTHER: You can also specify other tags that you might also want to add to your student(s).
Examples:
-
tag 1 t/goodStudentadds the tag of “goodStudent” to the first student in the current list.
-
tag all t/goodstudent t/potentialTAadd bothgoodStudentandpotentialTAtag to the all student in the current list.
See Also:
untag
5.4.9 Removing tag from student: untag
Function: Removes the specified tag(s) from the student(s).
Accidentally tagged a student wrongly, or simply don’t want it there anymore? This is the command for the job.
Format: untag INDEX/ALL t/TAG [t/OTHER]
-
INDEX: You can specify index of the student to remove the tag from. The index refers to the index number shown in the displayed student list. The index must be a positive integer 1, 2, 3, …
-
ALL: You can remove the tag for all students in the currently displayed list.
-
TAG: You can specify theTAGto remove.There should be at least one label to be removed when you use this command. For the restrictions on the format of aTAG, see Note 1 for Add tag to student.
-
OTHER: You can also include multiple tags to be removed from your student(s).
Examples:
-
untag 1 t/needMoreTimeremoves the tag ofneedMoreTimefrom the first student in the current list.
-
untag all t/needMoreTime t/lateremoves the tag ofneedMoreTimeandlatefrom all students in the current list.
See Also:
tag
5.5 Miscellaneous
- 5.5.1 Exiting the program:
exit - 5.5.2 Saving the data
- 5.5.3 Backing up data
- 5.5.4 Editing the data file
- 5.5.5 Viewing help:
help
5.5.1 Exiting the program: exit
Function: Exits the program.
Format: exit
5.5.2 Saving the data
StudMap data is saved in the hard disk automatically after any command that changes the data. There is no need to save manually.
5.5.3 Backing up data
StudMap data is saved as a JSON file [JAR file location]/data/studmap.json. You can make a copy of this
file if you want to back up your data.
5.5.4 Editing the data file
As mentioned above, your StudMap data is saved as a JSON file [JAR file location]/data/studmap.json. Advanced users
are welcome to update data directly by editing that data file.
5.5.5 Viewing help: help
Function: Shows a message linking to the online User Guide.
Confused about the usage of a certain feature? Don’t worry, self-help is available on the comprehensive online User
Guide, right here!

Format: help
6. Frequently Asked Questions
Q: How do I transfer my data to another Computer?
A: Install the app in the other computer and overwrite the empty data file it creates with the file that contains
the data of your previous StudMap home folder. See how to back up your data here.
Q: How can I transfer my data from an existing spreadsheet to StudMap?
A: You can use the import feature.
Q: Do I have to pay to use StudMap?
A: StudMap is completely free!
Q: Why is the list empty when I use the feature list?
A: It is likely that you have not added/transferred any data into StudMap. Start adding students
through our import or add feature now!
Q: Why do I need to state the student’s student ID to add him/her into StudMap?
A: To track a student effectively, we deem student ID as an important aspect since most assignments
require students to state their student ID.
Q: What if there are 2 student of the same given name?
A: By using either find or filter feature, you will be able to search for
the specific student even if they have the same given name.
7. Command Summary
| Action | Format, Examples |
|---|---|
| Add |
add n/NAME m/MODULE id/ID [p/PHONE] [e/EMAIL] [g/GITNAME] [h/TELEHANDLE] [t/TAG]… e.g., add n/John Doe p/98765432 e/johnd@example.com m/CS2103T id/E1234567 g/user1 h/@user1 t/friends t/owesMoney
|
| Delete |
delete INDEX/ALLe.g., delete 3
|
| Clear | clear |
| Import CSV | import |
| List | list |
| Find |
find KEYWORD [MORE_KEYWORDS]e.g., find James Jake
|
| Sort |
sort ORDER a/ATTRIBUTE e.g., sort asc a/name
|
| Filter | filter |
| Edit |
edit INDEX/ALL [n/NAME] [p/PHONE] [e/EMAIL] [m/MODULE] [id/ID] [g/GITNAME] [h/TELEHANDLE] [t/TAG]… e.g., edit 1 p/91234567 e/johndoe@example.com
|
| Mark attendance |
mark INDEX/ALL STATUS c/CLASS e.g., mark 1 present c/T01
|
| Unmark attendance |
unmark INDEX/ALL c/CLASS e.g., mark 1 c/T01
|
| Grade assignment |
grade INDEX/ALL STATUS a/ASSIGNMENT e.g., grade 1 new a/A01
|
| Remove assignment |
ungrade INDEX/ALL a/ASSIGNMENT e.g., ungrade 1 a/A01
|
| Record participation |
participate INDEX/ALL STATUS p/COMPONENT e.g., participate 2 yes p/C01
|
| Remove participation |
unparticipate INDEX/ALL p/COMPONENT e.g., unparticipate 2 p/C01
|
| Add tag |
tag INDEX/ALL t/TAG [t/OTHER] e.g., tag 2 t/goodStudent
|
| Remove tag |
untag INDEX/ALL t/TAG [t/OTHER] e.g., untag 2 t/goodStudent
|
| Exit | exit |
| Help | help |
8. Glossary
Alphanumeric
An alphanumeric character is one that is either a number (0-9) or a letter (any letter of the alphabet, lower or upper case). An input described as alphanumeric means that all the characters of the input must follow these constraints (i.e. composed only of letters and/or numbers).
Command
A command is an instruction for StudMap, and the main way to interact with it! Learn more about commands by looking at the Understanding Commands section, and check out the Features section to see what commands are available.
Command Line Interface (CLI)
Command Line Interface (CLI) is a method of interaction between the user and StudMap primarily through typing out instructions, or commands.
CSV (Comma-separated Values) file
This is a file type that many applications use for importing and exporting data. That’s why we’re using it for import!
JSON file
This is a file type that many applications use for storing data in a human-readable format. We’re also using it, so that advanced users can edit their student data easily if they wish.
Module
Each module of study has a unique module code consisting of a two- or three-letter prefix that generally denotes the
discipline, and four digits, and sometimes a suffix. e.g. CS2101, CS2103T.
Participation Component
This is a flexible label for any aspect of your tutorial / lab class or module that should be graded for participation.
For instance, if you want to reward those who actively share their answers in class, you can label a component called SharedAnswers
which reflects their class participation.
Tag
This is a small label that you can add to student entries, enabling you to keep track of small details about your students,
and better identify them. For instance, you can tag weaker students as NeedsHelp or Macintosh users as MacUsers.